[Confirmed still working great even on International Flights as of AUGUST 2020]
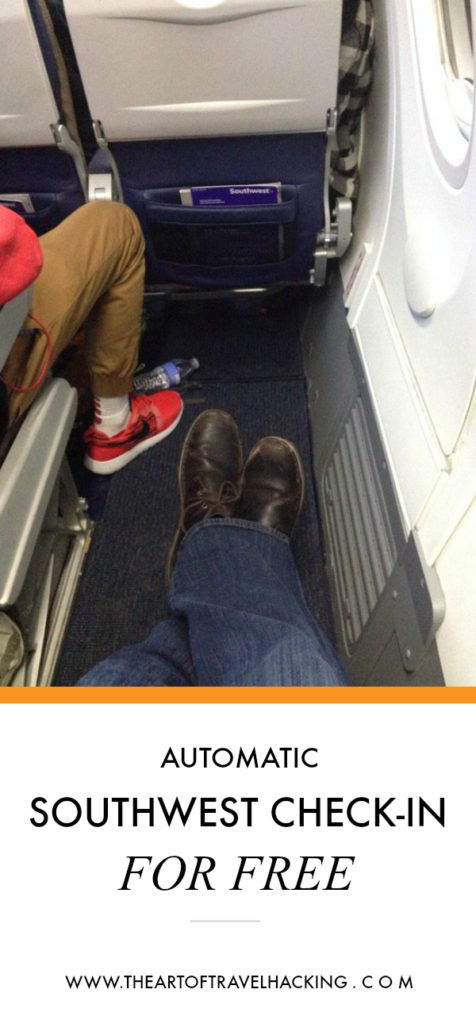
Living near BWI Airport (Southwest hub) and having the Southwest Companion pass for the past 4 years, I fly Southwest a LOT. The flight attendants are very friendly, there is no charge for checking two bags, tons of nonstop flights from BWI, and there are no change or cancellation fees. One thing I don’t like about Southwest is their open seating policy. Let me explain.
How it works
Southwest’s open seating policy is unique to the airline industry – I can’t think of another airline that does it. Seats are not assigned. When you check in for your flight, you are assigned a boarding group (A, B, or C) and a number in the group (1-60).
When it’s time to board, usually 30 minutes prior to departure, this is the following boarding order:
- Preboarders – passengers with disabilities or needing assistance
- A1 thru A15 – passengers who purchase the most expensive Business Select Fares
- A15 thru A60
- Active Military & Family Boarding – immediate family members traveling with children 6 and under
- B1 thru B60
- C1 thru C60
Getting a better boarding position
There are a few ways to get a better boarding position if you are not disabled or traveling with children 6 and under:
- Most Expensive – purchase a Business Select fare to receive A1-A15
- Least Expensive – purchase early bird check-In for $15-$25 dollars – Southwest will automatically check-in for you 36 hours before departure. While not guaranteed an A boarding group, your chances are very good.
- Buy an upgraded boarding position A1-A15 if they are not sold out and available. Upgraded boarding usually costs $30-$50 depending on the flight. Don’t forget the Southwest Rapid Rewards Priority card and the Southwest Rapid Rewards Performance Business card reimburse you for four upgraded boarding positions each year.
- Free – check in exactly at the 24 hour before departure mark
While the early bird check-in cost is not totally outrageous, it can add up if you are a family of 4. $15 x 4 = $60 each way, or $120 or more for a roundtrip flight.
I usually check in at the 24 hour mark and have always received either between a late A boarding (A45-A60) thru a late B boarding number depending on the flight and time of year. I have always been able to get an aisle or window seat even during the busiest travel times of the year (Christmas, Thanksgiving, & Spring Break). I have never received a C boarding number and have never been stuck in a middle seat.
The Travel Hack
Since checking in exactly at the 24 hour mark is key to getting the best boarding position without any extra cost, I’m going to show you how to install a script (small program written by someone) on your web browser that will check you in automatically.
You won’t have to be sitting at your computer at the 24 hour prior to departure mark waiting to check in. The script will even have your boarding pass sent by text to your mobile phone.
There are a few steps involved in setting this up. First we are going to install a script manager, Tampermonkey – a browser extension to run the script. Tampermonkey is a free browser extension to mange scripts. Tampermonkey is available for Chrome, Safari, Firefox, Opera, and a some Android browers (UC Browser & Dolphin Browser).
Then I’ll show you how to run the script. In my example below, I show you how to install using Google Chrome. Steps should be very similar with other web browsers.
Tampermonkey Installation
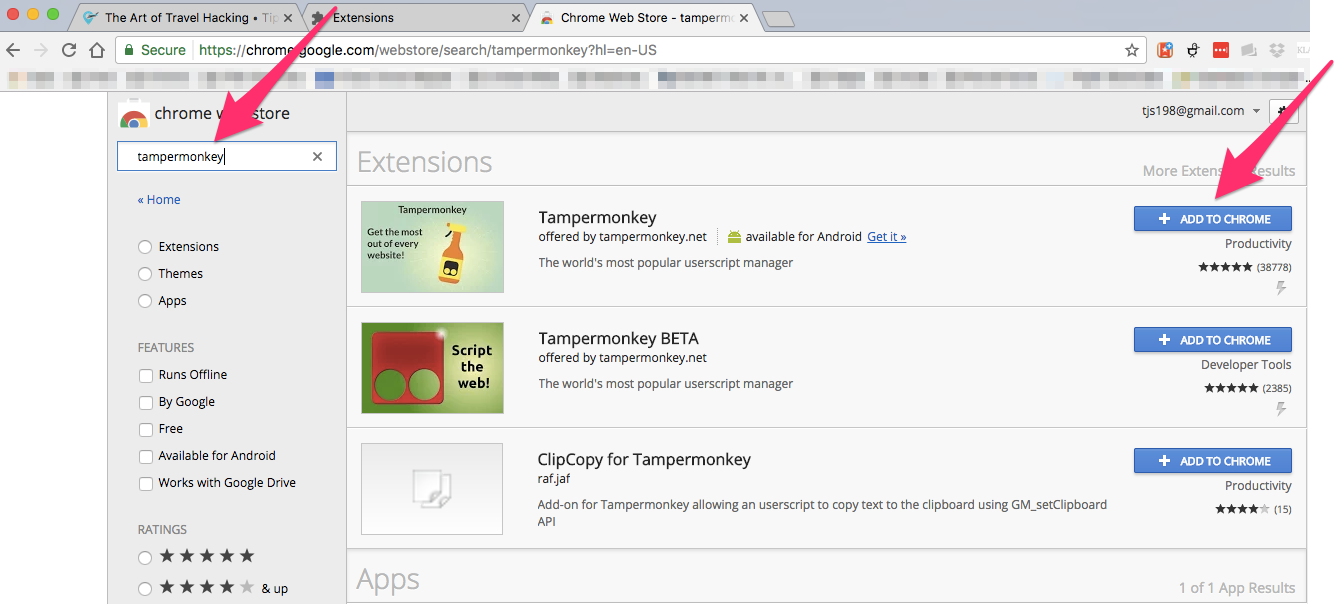
Step 1 – Go to Chrome Extensions store and search for Tampermonkey: https://chrome.google.com/webstore/search/tampermonkey
Step 2 – Click on ‘+ Add to Chrome’ button
Step 3 – Look for the rectangular with two circles icon in the toolbar and click on it, then click to ‘Enable’ Tampermonkey
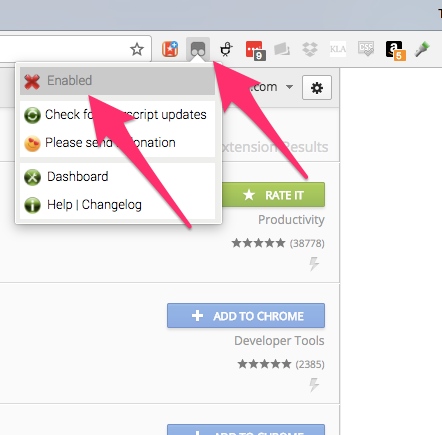
Step 4 – You will know it is enabled when there is a green checkmark and not a red x
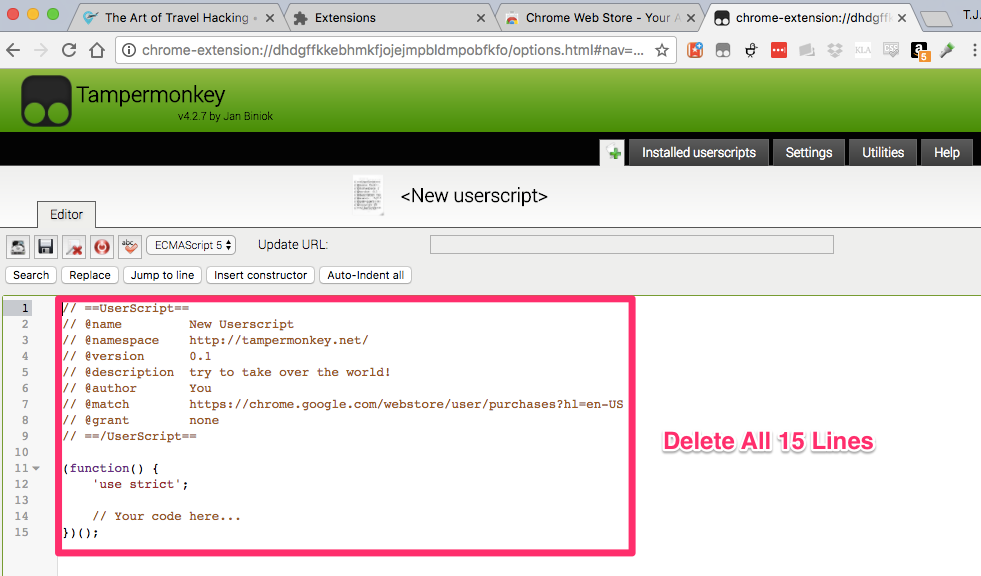
Step 5 – Click on ‘Create a new script…’
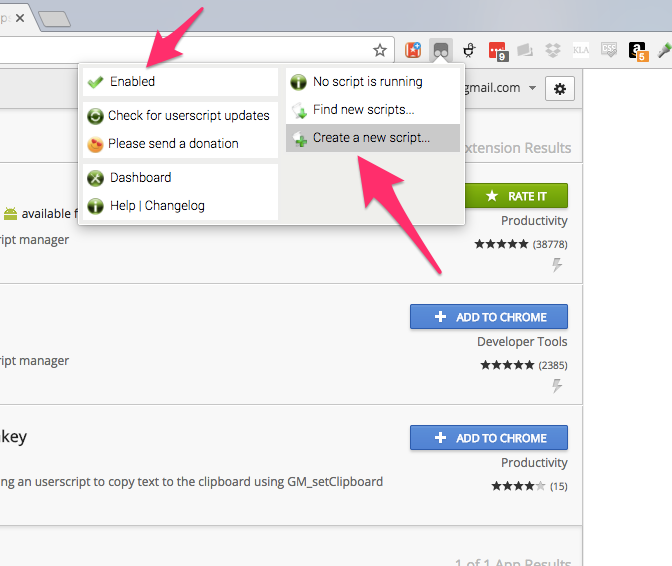
Step 6 – Delete the 15 lines of example code
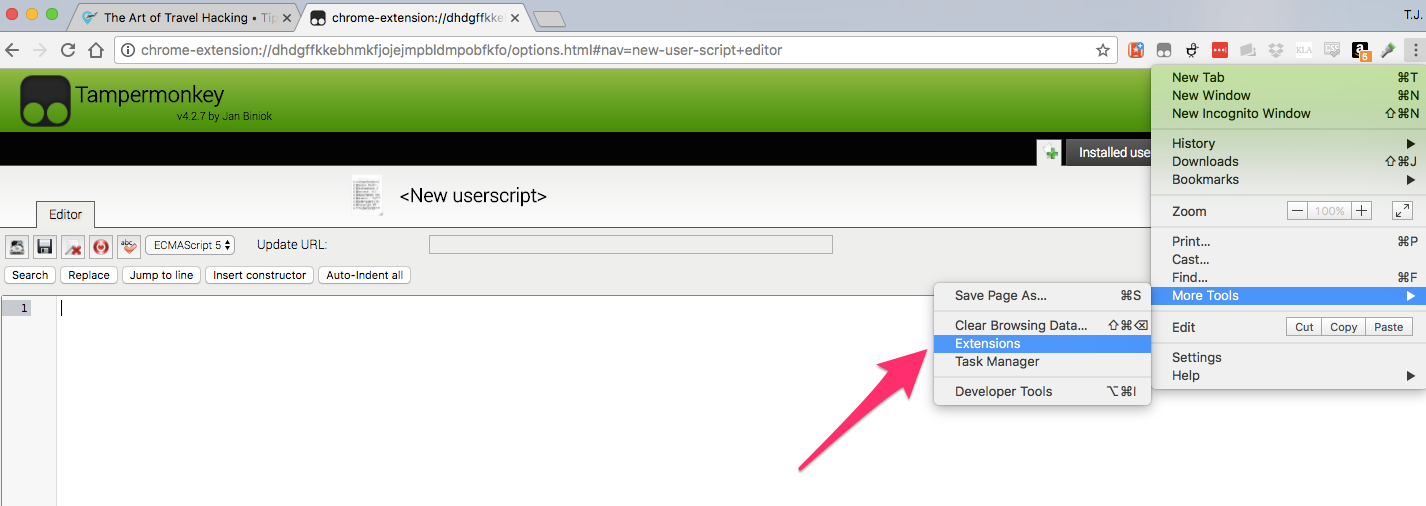
Step 7 – Go to Chrome’s Extensions, click the settings icon -> more tools -> extensions
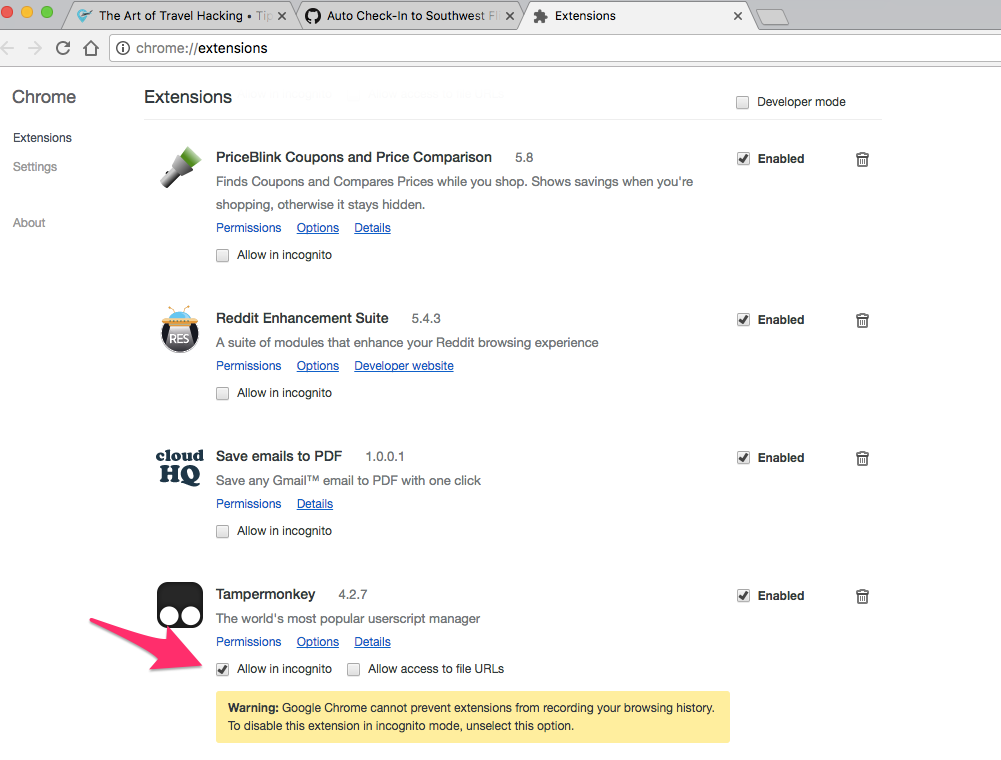
Step 8 – Scroll down until you get to Tampermonkey and check the ‘Allow in incognito’ box.
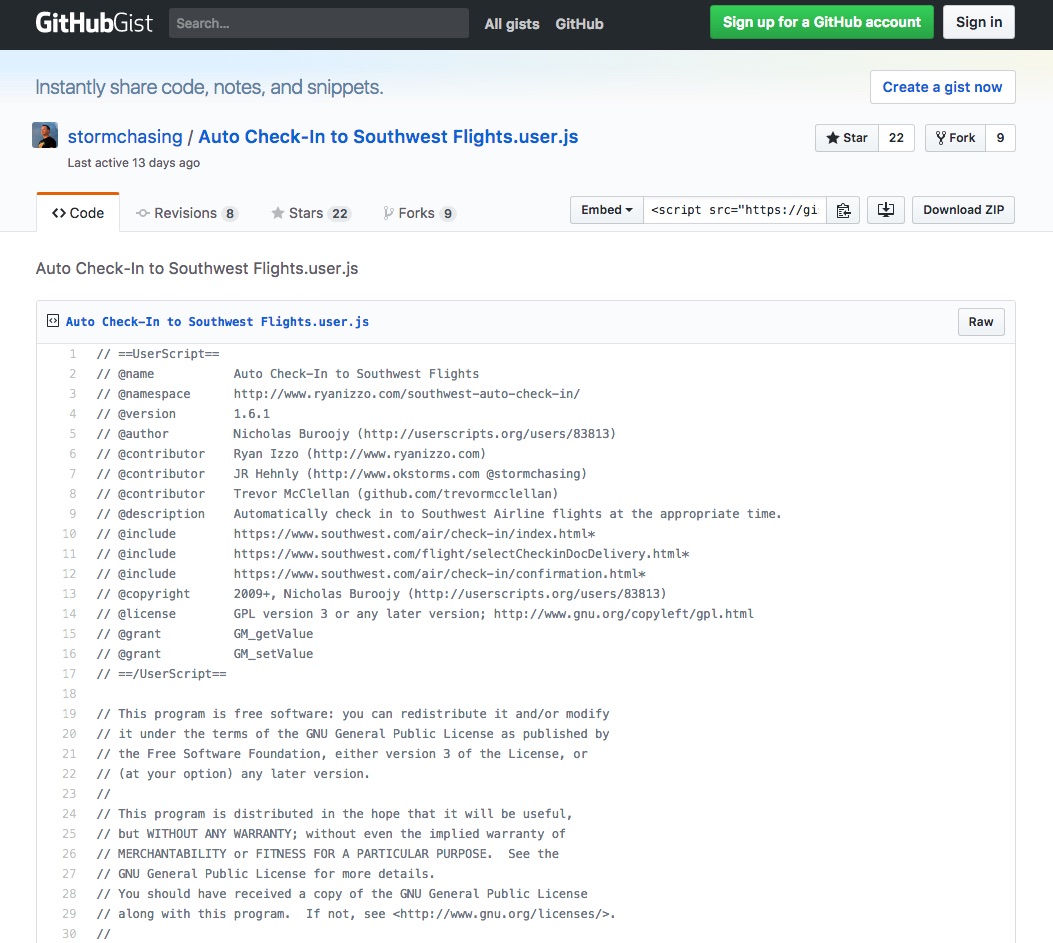
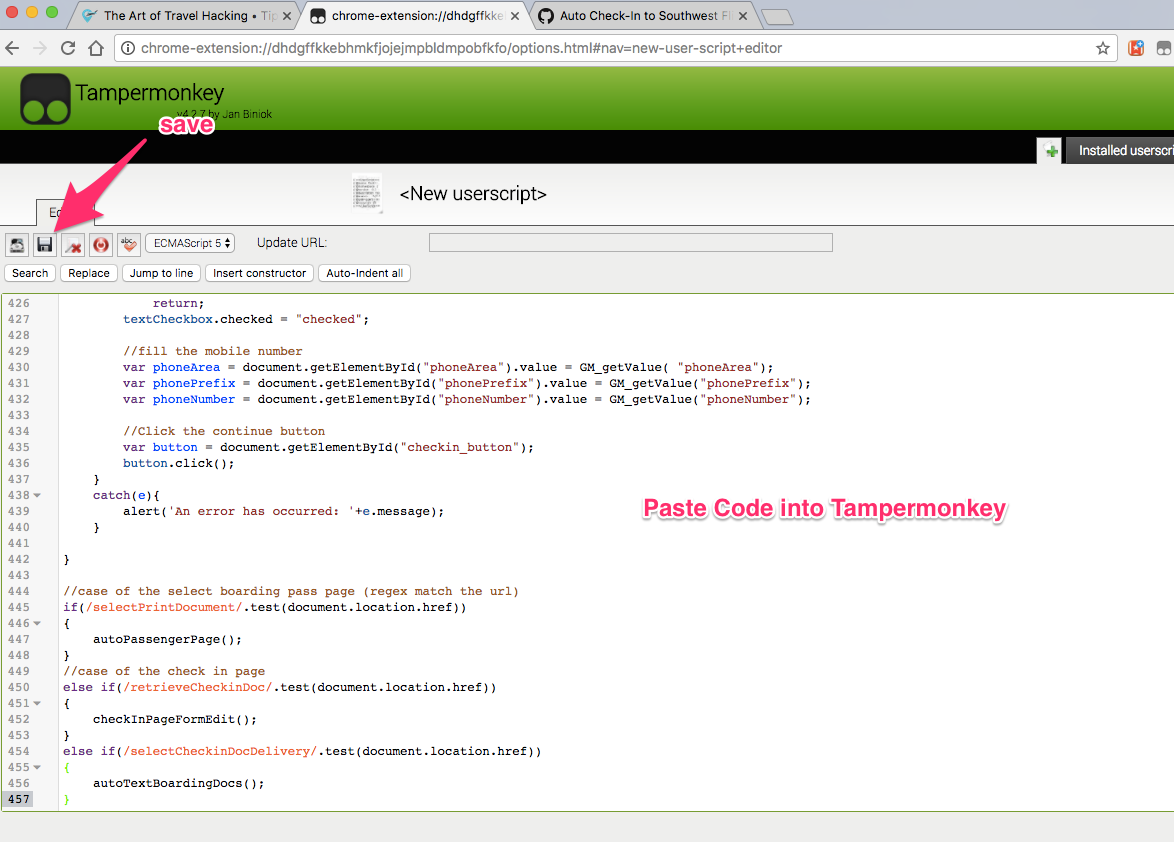
Step 9 – Head over to https://gist.github.com/shivangp/00e521f6ea4458c32560e462c33e3a15 to get the script
Step 10 – Copy ALL lines of code from 1 all the way down to the bottom (Version 1.9 of script has 566 lines of code)
Step 11 – Go back to the Tampermonkey tab from Step 6 and paste all lines of code into the new script
Step 12 – Hit the save button. The script is now should be running.
Using the Script
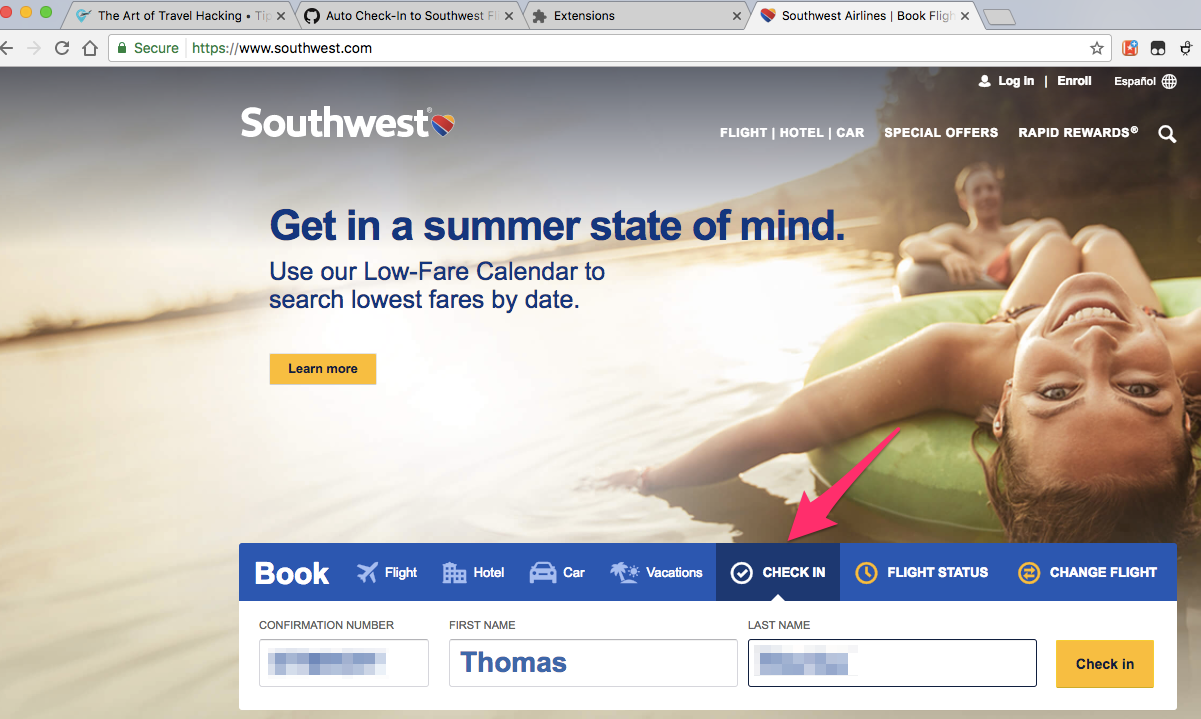
Step 1 – Head over to Southwest.com and click on the ‘Check In’ tab
Step 2 – You will get an error message that you can’t check in yet because the your flight is more than 24 hours from departure. If you see the ‘Set Check In Date and Time’ fields as shown below, this is the script running and was installed correctly. If you do not see the auto check-in box, try reloading the page.
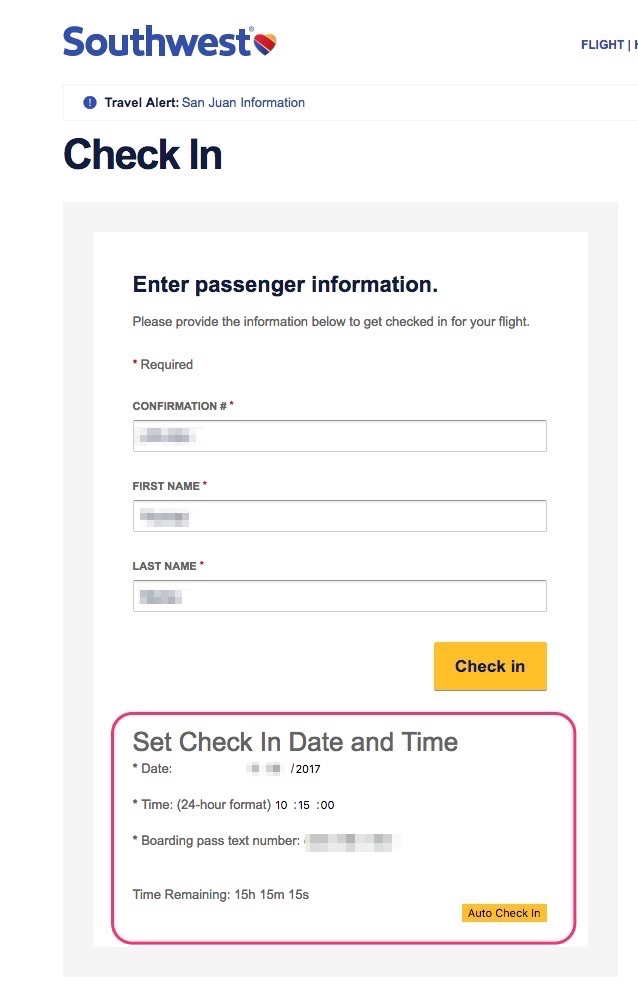
Step 3 – Enter your check in date & time (24 hours prior to departure).
Step 4 – Enter the phone number you would like the boarding pass texted to.
Step 5 – Click the ‘Auto Check In’ button. If you see the time remaining start and countdown, the script is working properly.
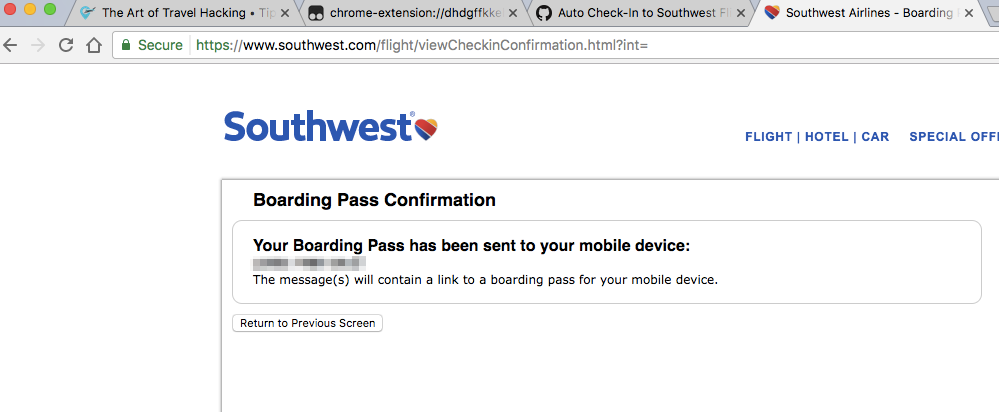
Step 6 – Sit back and let the script do it’s work, if everything worked properly, you will see this screen and get a text with your boarding pass at check in time.
Words of caution
- Depending on your computer, you may have to keep the hard drive from falling asleep so the script can run, on my Mac, I make this adjustment under System Preferences -> Energy Saver -> uncheck appropriate boxes.
- If you don’t want to mess with system preferences to keep your computer awake, I found a small simple free program called Caffeine (for Macs).
- When using the script Step 3 – don’t forget to make any adjustments for different time zones (i.e. you are setting this for your flight from San Diego to Baltimore but your computer is in Baltimore, don’t forget there is a 3 hour time difference for the departure time
- Open separate incognito windows and repeat the ‘using the script’ steps if you have multiple flights or multiple passengers to check in for. I’ll just minimize the windows once they are set and running.
- Confirmed to work with International flights – be sure to have your passport info and emergency contact information filled out beforehand or it won’t work (fill this info here: https://www.southwest.com/air/manage-reservation/index.html). Note you won’t get boarding pass texted to you since they have to check your passport at the airport – but you will be checked in.
Pin for later
Thanks for installing the Bottom of every post plugin by Corey Salzano. Contact me if you need custom WordPress plugins or website design.


Nice.
Might be an upgrade to have it repeatedly attempt to check in up to a minute before and a minute after or so as a failsafe. I know I went to manually check my husband in, and my clock was like a minute off, so I just kept hitting submit until it went.
Is there a timeline that it only operates within? For example, I’m getting an error message saying the flight is more than 2 weeks away. Could be the code, or maybe I would get that message anyway and the extension is operating out of sight?
Looks like the author of the script put in 2 week time limit. I found this in the code “var maxDays = 14;” – want to try to change the 14 to 365 and see if it works?
Thanks, I think that got it to work! Will report back on success.
Curious if changing it from the date frame worked?
I can testify that the script works as of June 9 2017. Just got an A48 boarding pass for free! THANKS!
Fantastic – I’m testing another script/program that checks the price of Southwest tickets and texts you when it drops so you can rebook at the lower price – already saved $170 in 2 weeks.
What’s that script and where do you get it?
It’s called SWA-Dashboard at GitHub. Unfortunately Southwest contacted the author of the program and had him take it down. He will get in trouble if it is public.
Even though that one got taken down, I found another one – check it out: https://dkr.lmu.mybluehost.me/southwest-price-tracking/
I don’t think this works anymore. Twice it’s been a dud for me in the past few weeks, but it worked for me in April.
Trip isn’t until Dec flight leaves at 6:50…how far in advanced can I set this up for?
It looks like the author of the script put in a 2 week time limit. I found this in the code “var maxDays = 14;” – you should be able to change the 14 to 365 and see if it works.
This script used to work reliably. As of today September 8, 2017, I think something has changed on Southwest’s check-in page. As script no longer presents any options. Anyone else having this issue?
Just tried this myself and the script isn’t populating the ” Set Check In Date and Time” fields as shown on the SW check-in page in the instructions above. Let me know if someone finds a workaround / fix for this. Sounds like an exciting capability to have and I’d like to try it.
yes, looks like Southwest updated their check-in page, there is a comment at github (script location) of another user stating it no longer works. I’ll keep an eye to see if the script author updates it.
All – I found someone who updated the script to work with Southwest’s new check-in page. I tested it today and it worked for me. Link to script has been updated.
Can confirm it works for International flights provided you enter all the passport, contact, and other extraneous information prior to checking in. You should be doing that anyways but worked well this morning despite SW having major issues with their checkin page loading.
thanks for sharing data point – I enter passport info during ticket purchase but I never can find where to enter the emergency contact info they ask for when trying to check in – any ideas?
You can do everything from the Manage Reservation page prior to the flight: https://www.southwest.com/air/manage-reservation/index.html
Just to double confirm, this worked on the way back. There were some issues with the checkin page not loading correctly this past week but I was able to have it load no problem on Dec 2. Had to refresh a few times before the script auto loaded.
Another pro tip is to do a hard refresh to ensure its a clean load with no problems.
I can’t get the countdown timer just the error ugh was hoping to not have to sit at my computer to check in 3 reservations
Are you using Google Chrome? Did you ensure the script is running?
I am using Google, but it does say No Script Running. Any idea how it get it running? I followed the above steps
Did you get a big pink box saying “We are unable to retrieve your reservation” and the count down timer is not showing?
If so, just hit the page reload icon next to the home button icon next to the website address bar. Once you hit ‘reload’ – the pink box disappears and the countdown timer should appear. Also Tampermonkey will indicate the script is now running.
Thank you!!! I thought I did that thanks again…working
Worked for me. Opened up six separate windows to check-in six different people traveling in our group. We all got checked-in, in succession, with “A” boarding group. I staggered the starting check-in times by one second (starting with a 5 second delay) to make sure it didn’t overload.
Would it work to open multiple incognito tabs and set the check-in times each a second apart so that if one doesn’t work hopefully the next will?
yes that works! I was testing it out and did that very exact thing – I set it at the exact time, 1 second late, 3 seconds late, and 5 seconds late. I found out the exact time and 1 second late didn’t work, but at 3 & 5 seconds late it worked.
TJ – I successfully installed the program, but when I tried to change the “var maxDays =14” (line 203) it wouldn’t respond to any key I pushed. Should I make the change before I copy-paste ? I installed it on my desk top, will it work on my lap-top via Google Chrme, or do I need to install it on the lap-top also?
Thanks – SirJim
I am able to change that value even after it is installed. I just tried it and clicked on Tampermonkey icon in google chrome bar – then clicked on the dashboard – clicked on the script, scrolled down to line 203 and easily changed the value. don’t forget to hit the save disk icon. I did this from my desktop computer.
I would keep it on your desktop – the computer has to be running for it to work. so you probably don’t want to run it that far in the future in case of power outage that turns off your computer or system updates that require restart, etc.
I also just confirmed this works for International Flights too! Used it this past Sunday.
It worked !! I set it on 365. I will download the price tracking program next.
Uh oh – When I said “It worked” I meant that I changed the “14” to “365”. I just went to SWA and pushed the Check In button, but the “Set Check-in Date & Time” didn’t come up. It came up perfectly before I made the above change. Any ideas?
Thanks
I also tried it today, and it didn’t work.
Didn’t work for me either.
Something must be messed up with SW’s clock (or mine but I’m set to time.gov). I setup 6 different Chrome incognito windows.
My flight tomorrow is at 5:00pm so I set the first to at exactly 5:00pm; the 2nd I set 2 seconds later; the 3rd I set to 4 seconds later; the 4th I set to 6 seconds later, the 5th I set to 8 seconds later, and the 6th one was set to 10 seconds past 5:00pm.
When I got home and check the computer, the 4 of the 6 windows did not check it – the script worked by clicking the ‘check-in button on the website’ but I got an error message said ‘Online check-in not valid at this time’ – meaning the time/clock is either messed up with my computer or on Southwest’s end.
But the two windows that were set to 8 & 10 seconds after 5:00pm worked and I got checked in.
The program author made some adjustments in March to the program (use new code at github site). Here is what he did (I wish I knew how to code):
“Just updated this script prior to my last southwest flight. Was getting a “too early” error from Southwest when I had the time seconds set to 01 or 02. Setting it to default to 04 seems to fix that. I also removed the “text your boarding pass” option as I was unable to successfully submit the number due to some phone number validator requiring manual text entry before the submit button and I could not simulate that in the few minutes I tried to debug. May try and re-enable that feature in the future.”
Any way to set this up with this scenario:
(a) Already checked in for outbound flight (less than 24 hours)
(b) Need to set it up for return flight but attempting to do so now just confirms the outbound check in.
(c) Cannot do it after the outbound flight is completed because that flight lands 5 minutes after the 24hr window opens to check in for the return flight.
In hindsight, I realize now it would have been better to book the outbound and return on separate record locators to avoid this problem.
That is a unique situation, so try I don’t see a way around that since you are within 2r hours already.
Like you said, best to book two one ways for different record locators.
Sorry
I downloaded and followed the instructions and everything seems to be working. However, if I try to log back in I do not see the timer. How do I know if it is still working. I need to check in tomorrow for a flight on May 2nd.
You don’t have to login to southwest to use the script. But you do have to keep the page open until the check in date and time. I open an incognito window for it. Make sure your computer doesn’t go to sleep. Read the ‘words of caution’at the end of the post.
OMG Thank you! Very clear instructions (I am a developer, however). I’m mesmerized by the count-down clock. I will be watching the screen 10 minutes before my check-in. Thank you again.
Does this still work?
Script still working as of August 2020. The newest version (1.9) adds the functionality to keep retrying every second (some people were having issues with a few seconds).